
Making accessible teaching and other materials helps all users engage with your content.
No need to guess about accessibility
The Canvas Ally Course Accessibility Report (available under the left menu of options in blue font in Canvas) scans course content and provides alternative formats.
Microsoft Office’s Accessibility Checker (under the “Tools” menu) reviews files for common issues.
-
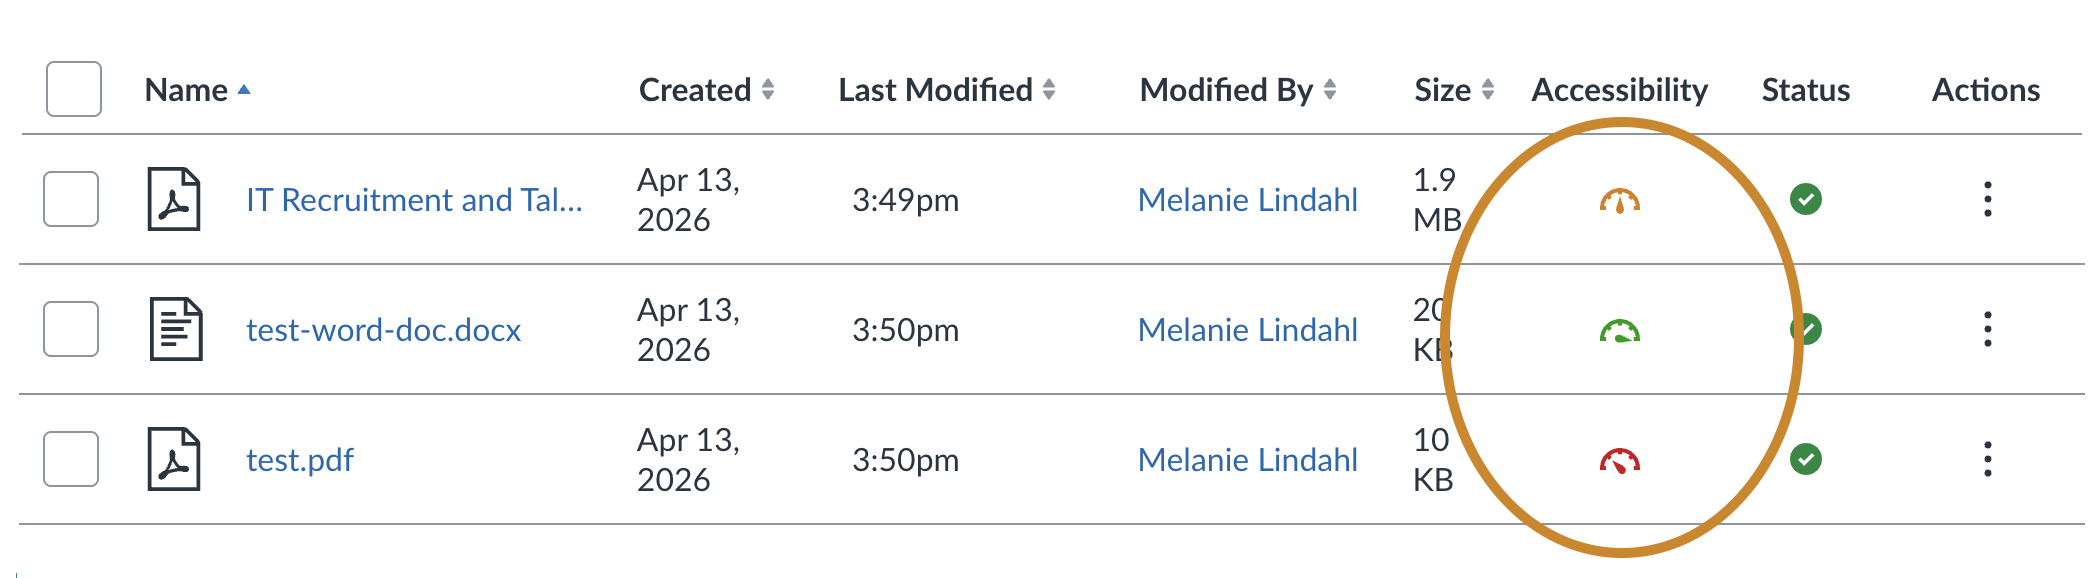
In Canvas, simply click on an any accessibility score icon to highlight and learn how to fix issues.
-
In Microsoft Word, PowerPoint, and Excel:
- Choose Review
- Select Check Accessibility to enable the right pane.
- Work through the identified issues where you can learn how to fix each.
Top tips to improve accessibility
1. Identify files to share
Before you begin improving accessibility, identify which files you’ll share to avoid unnecessary work. Archive other files, for instance in a separate folder or in a separate Canvas course.
-
When importing content from a previous course, select only the documents you need for the new semester. Unselected materials remain available in your original course for five years after the course ended.
Detailed Canvas instructions for importing content from one course to another
-
If you need a centralized archive of materials within Canvas to copy to individual courses, LTS can create a sandbox course to be used as an archive for you to organize materials into folders by semester or course. This keeps archived content available to you within Canvas without mixing it with active course materials.
Request a sandbox Canvas course to house your archive.
Learn how to organize files into folders within Canvas.
Learn how to import specific files / folders from your archive sandbox into your Canvas course.
Another benefit of keeping materials in a sandbox archive course is the accessibility score indicator next to each file in your Files repository.
-
Create course-specific shared folders that contain only the files you’re actively using. Keep older or archived materials in separate, non-shared folders.
2. Fix PDFs
Making your files accessible is the most impactful step you can take.
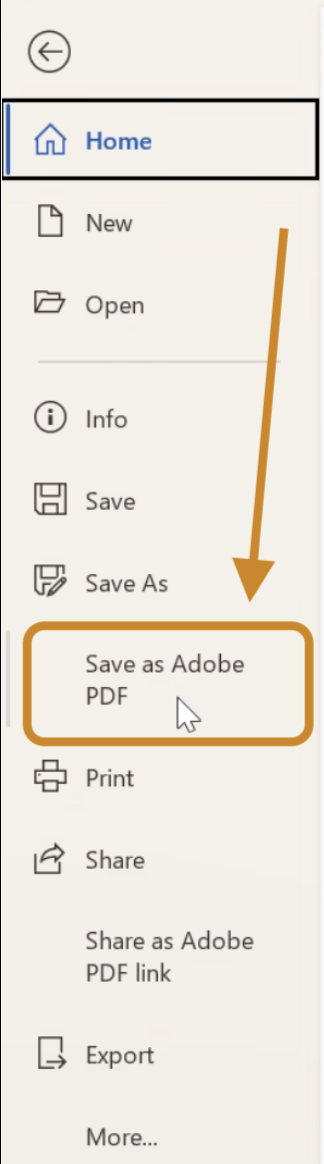
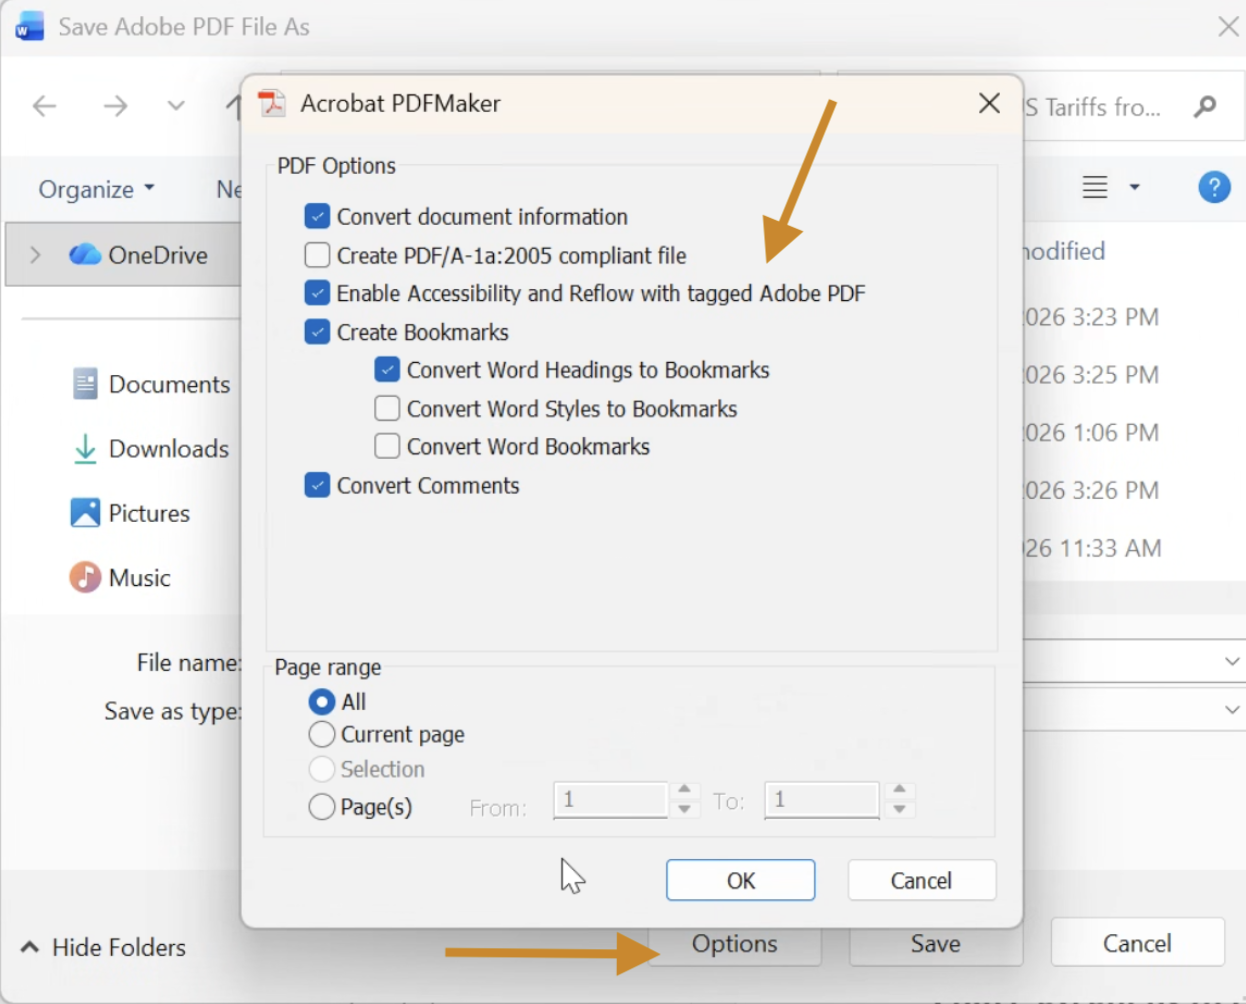
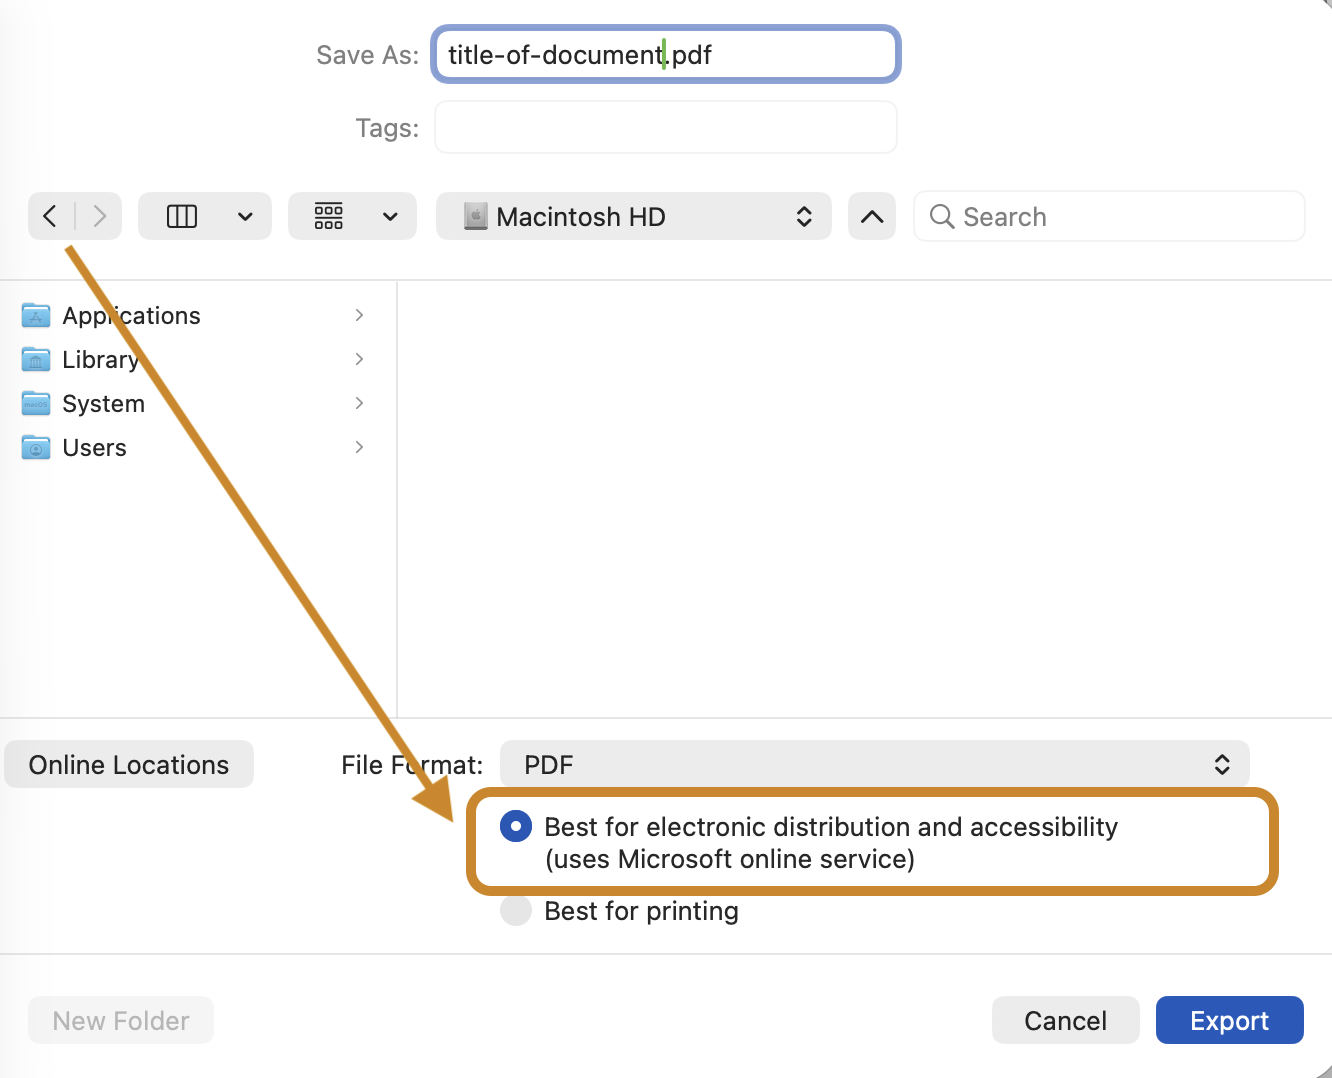
New PDFs. When converting a Word document to PDF, first be sure that the Word document uses headings through the Styles function in the Format menu. Then, instead of using the Print function to save it as a PDF, use “Save as Adobe PDF” on Windows or “Save As” on Mac.
Old PDFs: You can use Adobe Acrobat Pro’s built-in accessibility features to add tags and alternative text to existing PDFs. Note: you cannot remediate files in Acrobat Reader. If you don’t have Adobe Acrobat Pro, or need more information about how this might work, please submit a help ticket with LTS.
-
Tagging a PDF can increase Canvas Ally scores dramatically.
- After opening the PDF in Adobe Acrobat Pro, choose All Tools and scroll down the list.
- Click View more.
- Click Prepare for accessibility.
- Select Automatically tag PDF.
- If Adobe asks if you want to re-tag your PDF, select Confirm to continue.
- Once it’s done tagging, the right pane should open with the new tagging structure.
- Save the PDF, and upload it to your teaching materials.
-
“Guided actions” in Adobe Acrobat Pro allow you to tag PDFs and then save them with one click.
To set up the guided action:
- Open all Tools
- Find Use guided action in the tools list and click Open.
- In the left panel, under Add and Manage, click Actions and select New action.
- In the left list, open Accessibility and choose Autotag document.
- Click the right-facing arrow in the middle of the window to move the action to the right side.
- Back in the left list, open Save and Export and move over Save. Adjust the save settings however you need.
- Your new guided action is now in the left panel. Select it.
- Under Files to be Processed, add a folder.
- Click the Start button at the bottom of the left panel.
- Click Done when the processed has finished.
-
- After opening the PDF in Adobe Acrobat Pro, choose All Tools and scroll down the list.
- Click View more.
- Click Prepare for accessibility.
- Select Check for accessibility.
- You can uncheck the Report option at the top to Create an accessibility report.
- Click Start Checking.
- A right panel opens up with the results. You can open any that says there are issues.
- Right-click any that need attention, and choose Fix if that option is available to work through remediation.
- Save the PDF, and upload it to your teaching materials.
-
OCR (Optical Character Recognition) turns pictures of text into real, readable text. We use it on old PDFs because without it, scanned pages are just images, which means search tools and screen readers can’t read them.
In the All Tools panel of Adobe Acrobat Pro:
- Select Scan & OCR.
- Under the Recognize Text heading, choose In this file.
- Click the button Recognize text.
- Save the PDF, and upload it to your teaching materials.
3. Describe images with alt text
Alt text (alternative text) is a brief image description that screen readers use to explain the image to users who can’t see it. Good alt text is concise and contextual.
What makes good alt text?
- Keep it concise: aim for one to two sentences.
- Describe what’s important about the image in context.
- Don’t start with “image/picture of” because screen readers already announce it’s an image.
- If an image is purely decorative (design elements), mark it as decorative so screen readers skip it.

-
When you insert an image in the Canvas editor:
- Click on the image
- Select Image Options.
- Enter your description in the field provided on the right.
- If the image is decorative, check the box for Decorative Image.
-
Two ways to add alt text to images in Word:
- In the Check Accessibility pane, click on the missing alt text section. Either enter the image’s description, or if the image is decorative, mark it as such.
- Right-click on the image and select View Alt Text. Either enter the description or mark the image as decorative.
-
- Under Review, open the Check Accessibility panel.
- Choose the flag for Missing Alt Text.
- Enter the image’s description, or if the image is purely decorative, select Mark as Decorative.
Bad: “Bar chart displaying law school application numbers for 2020, 2021, 2022, 2023, 2024, and 2025 with blue bars representing each year and a legend at the bottom”
Good: “Applications increased 23% from 2020 to 2025, with the sharpest growth in 2023-2024”
4. Headings and formatting
Use headings to organize content in Canvas and Word (including through the Styles function under the Format menu in Word). In PowerPoint, aim for unique headings for every slide, high-contrast colors, and slide numbering to help screen readers read content correctly and in order.
-
Headings help screen readers navigate through your content by creating a clear structure. When editing content in Canvas (Pages, Assignments, Announcements, etc.), follow these guidelines:
- Start with Heading 2. Canvas automatically uses Heading 1 for page titles, so your first content heading should be Heading 2
- Use subheadings in order. If you need subheadings under Heading 2, use Heading 3. Under Heading 3, use Heading 4. Don’t skip levels (for example, don’t jump from Heading 2 to Heading 4).
-
Headings help screen readers navigate your document. You can change how headings look, but always apply them using the Styles gallery. Don’t just make text bold or larger manually.
- Find your Styles gallery on the Home tab.
- Use Heading 1 for main sections.
- Use Heading 2 for subsections.
- Use Heading 3 for details under subsections.
- Always apply headings in order. Don’t skip from Heading 1 to Heading 3.
- Feel free to apply different font styling to your Headings using the Styles Pane.
-
- Use built-in slide layouts to ensure proper reading order for screen readers.
- Run the Accessibility Checker (Review > Check Accessibility).
- Verify all images have alt text.
- Confirm text is readable (good color contrast, large enough font).
- Test the reading order (Accessibility > Reading Order Pane to see object order on each slide).
Tips to save a PDF
-
When using Windows, be sure to choose the option “Save as Adobe PDF” which gives you the needed settings for accessibility.
-
When using a Mac, be sure to choose the option “Save as Adobe PDF” which gives you the needed settings for accessibility.
Have other questions?
If you need tools to assist you, like Adobe Acrobat Pro, or have accessibility questions, submit a help ticket with LTS.
The UT Digital Accessibility Center (DAC) can directly assist in remediating your documents.